This is mostly what I’ve done on a fresh debian 10 installation, after updating it and installing unzip.
wget https://dl.vikunja.io/api/0.18.0/vikunja-v0.18.0-linux-amd64-full
mkdir -p /opt/vikunja
unzip vikunja-v0.18.0-linux-amd64-full -d /opt/vikunja
chmod +x /opt/vikunja
ln -s /opt/vikunja/vikunja-v0.18.0-linux-amd64 /usr/bin/vikunja

nano /etc/systemd/system/vikunja.service
nano /opt/vikunja/config.yml.sample
mv /opt/vikunja/config.yml.sample /opt/vikunja/config.yml

systemctl enable vikunja
systemctl start vikunja
systemctl status vikunja

wget https://dl.vikunja.io/frontend/vikunja-frontend-0.18.0.zip
unzip vikunja-frontend-0.18.0.zip -d /home/vikunja
apt install nginx
nano /etc/nginx/nginx.conf

nginx -t
service nginx reload
service nginx start

systemctl restart vikunja
nginx.conf:
user www-data;
worker_processes auto;
pid /run/nginx.pid;
include /etc/nginx/modules-enabled/*.conf;

events {
	worker_connections 768;
	# multi_accept on;
}

http {

	##
	# Basic Settings
	##

	sendfile on;
	tcp_nopush on;
	tcp_nodelay on;
	keepalive_timeout 65;
	types_hash_max_size 2048;
	# server_tokens off;

	# server_names_hash_bucket_size 64;
	# server_name_in_redirect off;

	include /etc/nginx/mime.types;
	default_type application/octet-stream;

	##
	# SSL Settings
	##

	ssl_protocols TLSv1 TLSv1.1 TLSv1.2; # Dropping SSLv3, ref: POODLE
	ssl_prefer_server_ciphers on;

	##
	# Logging Settings
	##

	access_log /var/log/nginx/access.log;
	error_log /var/log/nginx/error.log;

	##
	# Gzip Settings
	##

	gzip  on;
	gzip_disable "msie6";

	gzip_vary on;
	gzip_proxied any;
	gzip_comp_level 6;
	gzip_buffers 16 8k;
	gzip_http_version 1.1;
	gzip_min_length 256;
	gzip_types text/plain text/css application/json application/x-javascript text/xml application/xml application/xml+rss text/javascript application/vnd.ms-fontobject application/x-font-ttf font/opentype image/svg+xml;

	server {
	    listen       80;
	    server_name  localhost;

	    location / {
	        root   /home/vikunja;
	        try_files $uri $uri/ /;
		index  index.html index.htm;
		}
	}

	##
	# Virtual Host Configs
	##

	include /etc/nginx/conf.d/*.conf;
	#include /etc/nginx/sites-enabled/*;
}


#mail {
#	# See sample authentication script at:
#	# http://wiki.nginx.org/ImapAuthenticateWithApachePhpScript
#
#	# auth_http localhost/auth.php;
#	# pop3_capabilities "TOP" "USER";
#	# imap_capabilities "IMAP4rev1" "UIDPLUS";
#
#	server {
#		listen     localhost:110;
#		protocol   pop3;
#		proxy      on;
#	}
#
#	server {
#		listen     localhost:143;
#		protocol   imap;
#		proxy      on;
#	}
#}
config.yaml:
service:
  # This token is used to verify issued JWT tokens.
  # Default is a random token which will be generated at each startup of vikunja.
  # (This means all already issued tokens will be invalid once you restart vikunja)
  JWTSecret: "<jwt-secret>"
  # The interface on which to run the webserver
  interface: ":3456"
  # Path to Unix socket. If set, it will be created and used instead of tcp
  unixsocket:
  # Permission bits for the Unix socket. Note that octal values must be prefixed by "0o", e.g. 0o660
  unixsocketmode:
  # The URL of the frontend, used to send password reset emails.
  frontendurl: "tasks.agod.top"
  # The base path on the file system where the binary and assets are.
  # Vikunja will also look in this path for a config file, so you could provide only this variable to point to a folder
  # with a config file which will then be used.
  rootpath: /opt/vikunja
  # The max number of items which can be returned per page
  maxitemsperpage: 50
  # Enable the caldav endpoint, see the docs for more details
  enablecaldav: true
  # Set the motd message, available from the /info endpoint
  motd: ""
  # Enable sharing of lists via a link
  enablelinksharing: true
  # Whether to let new users registering themselves or not
  enableregistration: true
  # Whether to enable task attachments or not
  enabletaskattachments: true
  # The time zone all timestamps are in. Please note that time zones have to use [the official tz database names](https://en.wikipedia.org/wiki/List_of_tz_database_time_zones). UTC or GMT offsets won't work.
  timezone: GMT
  # Whether task comments should be enabled or not
  enabletaskcomments: true
  # Whether totp is enabled. In most cases you want to leave that enabled.
  enabletotp: true
  # If not empty, enables logging of crashes and unhandled errors in sentry.
  sentrydsn: ''
  # If not empty, this will enable `/test/{table}` endpoints which allow to put any content in the database.
  # Used to reset the db before frontend tests. Because this is quite a dangerous feature allowing for lots of harm,
  # each request made to this endpoint neefs to provide an `Authorization: <token>` header with the token from below. <br/>
  # **You should never use this unless you know exactly what you're doing**
  testingtoken: ''
  # If enabled, vikunja will send an email to everyone who is either assigned to a task or created it when a task reminder
  # is due.
  enableemailreminders: true
  # If true, will allow users to request the complete deletion of their account. When using external authentication methods
  # it may be required to coordinate with them in order to delete the account. This setting will not affect the cli commands
  # for user deletion.
  enableuserdeletion: true

database:
  # Database type to use. Supported types are mysql, postgres and sqlite.
  type: "sqlite"
  # Database user which is used to connect to the database.
  user: "vikunja"
  # Databse password
  password: ""
  # Databse host
  host: "localhost"
  # Databse to use
  database: "vikunja"
  # When using sqlite, this is the path where to store the data
  path: "./vikunja.db"
  # Sets the max open connections to the database. Only used when using mysql and postgres.
  maxopenconnections: 100
  # Sets the maximum number of idle connections to the db.
  maxidleconnections: 50
  # The maximum lifetime of a single db connection in miliseconds.
  maxconnectionlifetime: 10000
  # Secure connection mode. Only used with postgres.
  # (see https://pkg.go.dev/github.com/lib/pq?tab=doc#hdr-Connection_String_Parameters)
  sslmode: disable
  # Enable SSL/TLS for mysql connections. Options: false, true, skip-verify, preferred
  tls: false

cache:
  # If cache is enabled or not
  enabled: false
  # Cache type. Possible values are "keyvalue", "memory" or "redis".
  # When choosing "keyvalue" this setting follows the one configured in the "keyvalue" section.
  # When choosing "redis" you will need to configure the redis connection seperately.
  type: keyvalue
  # When using memory this defines the maximum size an element can take
  maxelementsize: 1000

redis:
  # Whether to enable redis or not
  enabled: false
  # The host of the redis server including its port.
  host: 'localhost:6379'
  # The password used to authenicate against the redis server
  password: ''
  # 0 means default database
  db: 0

cors:
  # Whether to enable or disable cors headers.
  # Note: If you want to put the frontend and the api on seperate domains or ports, you will need to enable this.
  #       Otherwise the frontend won't be able to make requests to the api through the browser.
  enable: true
  # A list of origins which may access the api. These need to include the protocol (`http://` or `https://`) and port, if any.
  origins:
    - "*"
  # How long (in seconds) the results of a preflight request can be cached.
  maxage: 0

mailer:
  # Whether to enable the mailer or not. If it is disabled, all users are enabled right away and password reset is not possible.
  enabled: false
  # SMTP Host
  host: ""
  # SMTP Host port
  port: 587
  # SMTP username
  username: "user"
  # SMTP password
  password: ""
  # Wether to skip verification of the tls certificate on the server
  skiptlsverify: false
  # The default from address when sending emails
  fromemail: "mail@vikunja"
  # The length of the mail queue.
  queuelength: 100
  # The timeout in seconds after which the current open connection to the mailserver will be closed.
  queuetimeout: 30
  # By default, vikunja will try to connect with starttls, use this option to force it to use ssl.
  forcessl: false

log:
  # A folder where all the logfiles should go.
  path: <rootpath>logs
  # Whether to show any logging at all or none
  enabled: true
  # Where the normal log should go. Possible values are stdout, stderr, file or off to disable standard logging.
  standard: "stdout"
  # Change the log level. Possible values (case-insensitive) are CRITICAL, ERROR, WARNING, NOTICE, INFO, DEBUG.
  level: "INFO"
  # Whether or not to log database queries. Useful for debugging. Possible values are stdout, stderr, file or off to disable database logging.
  database: "off"
  # The log level for database log messages. Possible values (case-insensitive) are CRITICAL, ERROR, WARNING, NOTICE, INFO, DEBUG.
  databaselevel: "WARNING"
  # Whether to log http requests or not. Possible values are stdout, stderr, file or off to disable http logging.
  http: "stdout"
  # Echo has its own logging which usually is unnessecary, which is why it is disabled by default. Possible values are stdout, stderr, file or off to disable standard logging.
  echo: "off"
  # Whether or not to log events. Useful for debugging. Possible values are stdout, stderr, file or off to disable events logging.
  events: "stdout"
  # The log level for event log messages. Possible values (case-insensitive) are ERROR, INFO, DEBUG.
  eventslevel: "info"

ratelimit:
  # whether or not to enable the rate limit
  enabled: false
  # The kind on which rates are based. Can be either "user" for a rate limit per user or "ip" for an ip-based rate limit.
  kind: user
  # The time period in seconds for the limit
  period: 60
  # The max number of requests a user is allowed to do in the configured time period
  limit: 100
  # The store where the limit counter for each user is stored.
  # Possible values are "keyvalue", "memory" or "redis".
  # When choosing "keyvalue" this setting follows the one configured in the "keyvalue" section.
  store: keyvalue

files:
  # The path where files are stored
  basepath: ./files # relative to the binary
  # The maximum size of a file, as a human-readable string.
  # Warning: The max size is limited 2^64-1 bytes due to the underlying datatype
  maxsize: 20MB

migration:
  # These are the settings for the wunderlist migrator
  wunderlist:
    # Wheter to enable the wunderlist migrator or not
    enable: false
    # The client id, required for making requests to the wunderlist api
    # You need to register your vikunja instance at https://developer.wunderlist.com/apps/new to get this
    clientid:
    # The client secret, also required for making requests to the wunderlist api
    clientsecret:
    # The url where clients are redirected after they authorized Vikunja to access their wunderlist stuff.
    # This needs to match the url you entered when registering your Vikunja instance at wunderlist.
    # This is usually the frontend url where the frontend then makes a request to /migration/wunderlist/migrate
    # with the code obtained from the wunderlist api.
    # Note that the vikunja frontend expects this to be /migrate/wunderlist
    redirecturl:
  todoist:
    # Wheter to enable the todoist migrator or not
    enable: false
    # The client id, required for making requests to the todoist api
    # You need to register your vikunja instance at https://developer.todoist.com/appconsole.html to get this
    clientid:
    # The client secret, also required for making requests to the todoist api
    clientsecret:
    # The url where clients are redirected after they authorized Vikunja to access their todoist items.
    # This needs to match the url you entered when registering your Vikunja instance at todoist.
    # This is usually the frontend url where the frontend then makes a request to /migration/todoist/migrate
    # with the code obtained from the todoist api.
    # Note that the vikunja frontend expects this to be /migrate/todoist
    redirecturl: <frontend url>/migrate/todoist
  trello:
    # Wheter to enable the trello migrator or not
    enable: false
    # The client id, required for making requests to the trello api
    # You need to register your vikunja instance at https://trello.com/app-key (log in before you visit that link) to get this
    key:
    # The url where clients are redirected after they authorized Vikunja to access their trello cards.
    # This needs to match the url you entered when registering your Vikunja instance at trello.
    # This is usually the frontend url where the frontend then makes a request to /migration/trello/migrate
    # with the code obtained from the trello api.
    # Note that the vikunja frontend expects this to end on /migrate/trello.
    redirecturl: <frontend url>/migrate/trello
  microsofttodo:
    # Wheter to enable the microsoft todo migrator or not
    enable: false
    # The client id, required for making requests to the microsoft graph api
    # See https://docs.microsoft.com/en-us/azure/active-directory/develop/quickstart-register-app#register-an-application
    # for information about how to register your vikuinja instance.
    clientid:
    # The client secret, also required for making requests to the microsoft graph api
    clientsecret:
    # The url where clients are redirected after they authorized Vikunja to access their microsoft todo tasks.
    # This needs to match the url you entered when registering your Vikunja instance at microsoft.
    # This is usually the frontend url where the frontend then makes a request to /migration/microsoft-todo/migrate
    # with the code obtained from the microsoft graph api.
    # Note that the vikunja frontend expects this to be /migrate/microsoft-todo
    redirecturl: <frontend url>/migrate/microsoft-todo

avatar:
  # When using gravatar, this is the duration in seconds until a cached gravatar user avatar expires
  gravatarexpiration: 3600

backgrounds:
  # Whether to enable backgrounds for lists at all.
  enabled: true
  providers:
    upload:
      # Whethere to enable uploaded list backgrounds
      enabled: true
    unsplash:
      # Whether to enable setting backgrounds from unsplash as list backgrounds
      enabled: false
      # You need to create an application for your installation at https://unsplash.com/oauth/applications/new
      # and set the access token below.
      accesstoken:
      # The unsplash application id is only used for pingback and required as per their api guidelines.
      # You can find the Application ID in the dashboard for your API application. It should be a numeric ID.
      # It will only show in the UI if your application has been approved for Enterprise usage, therefore if
      # you’re in Demo mode, you can also find the ID in the URL at the end: https://unsplash.com/oauth/applications/:application_id
      applicationid:

# Legal urls
# Will be shown in the frontend if configured here
legal:
  imprinturl:
  privacyurl:

# Key Value Storage settings
# The Key Value Storage is used for different kinds of things like metrics and a few cache systems.
keyvalue:
  # The type of the storage backend. Can be either "memory" or "redis". If "redis" is chosen it needs to be configured seperately.
  type: "memory"

auth:
  # Local authentication will let users log in and register (if enabled) through the db.
  # This is the default auth mechanism and does not require any additional configuration.
  local:
    # Enable or disable local authentication
    enabled: true
  # OpenID configuration will allow users to authenticate through a third-party OpenID Connect compatible provider.<br/>
  # The provider needs to support the `openid`, `profile` and `email` scopes.<br/>
  # **Note:** Some openid providers (like gitlab) only make the email of the user available through openid claims if they have set it to be publicly visible.
  # If the email is not public in those cases, authenticating will fail.
  # **Note 2:** The frontend expects to be redirected after authentication by the third party
  # to <frontend-url>/auth/openid/<auth key>. Please make sure to configure the redirect url with your third party
  # auth service accordingy if you're using the default vikunja frontend.
  # Take a look at the [default config file](https://kolaente.dev/vikunja/api/src/branch/main/config.yml.sample) for more information about how to configure openid authentication.
  openid:
    # Enable or disable OpenID Connect authentication
    enabled: false
    # The url to redirect clients to. Defaults to the configured frontend url. If you're using Vikunja with the official
    # frontend, you don't need to change this value.
    redirecturl: <frontend url>
    # A list of enabled providers
    providers:
      # The name of the provider as it will appear in the frontend.
      - name:
        # The auth url to send users to if they want to authenticate using OpenID Connect.
        authurl:
        # The client ID used to authenticate Vikunja at the OpenID Connect provider.
        clientid:
        # The client secret used to authenticate Vikunja at the OpenID Connect provider.
        clientsecret:

# Prometheus metrics endpoint
metrics:
  # If set to true, enables a /metrics endpoint for prometheus to collect metrics about Vikunja.
  enabled: false
  # If set to a non-empty value the /metrics endpoint will require this as a username via basic auth in combination with the password below.
  username:
  # If set to a non-empty value the /metrics endpoint will require this as a password via basic auth in combination with the username below.
  password:
systemctl status vikunja
● vikunja.service - Vikunja
   Loaded: loaded (/etc/systemd/system/vikunja.service; enabled; vendor preset: enabled)
   Active: active (running) since Mon 2021-09-06 11:04:30 EDT; 5h 9min ago
 Main PID: 4400 (vikunja)
    Tasks: 6 (limit: 1149)
   Memory: 41.4M
   CGroup: /system.slice/vikunja.service
           └─4400 /usr/bin/vikunja
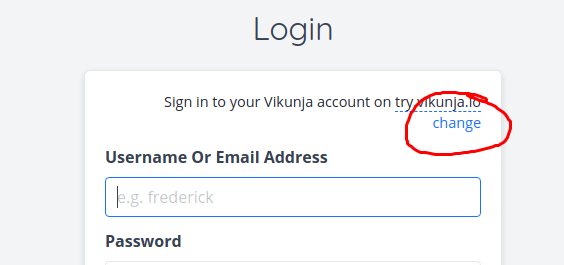
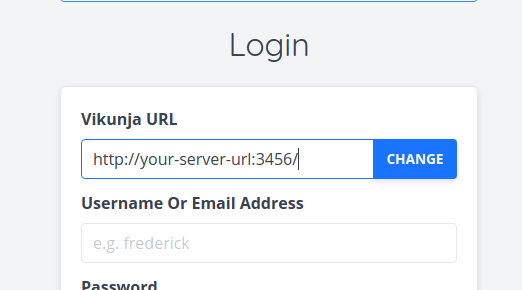
Current issue: The page displayed when accessing the webserver does not work correctly, as in if I register or login the page just seems to load something with no result.
Most likely the web page is not connecting to vikunja? I honestly tried to read the instructions again and again, I cannot find any explanation for my issue or how to fix, I’m sure I have not missed any steps or instructions. If I did, please correct me like you would with a 5 year old kid.
Thanks.